
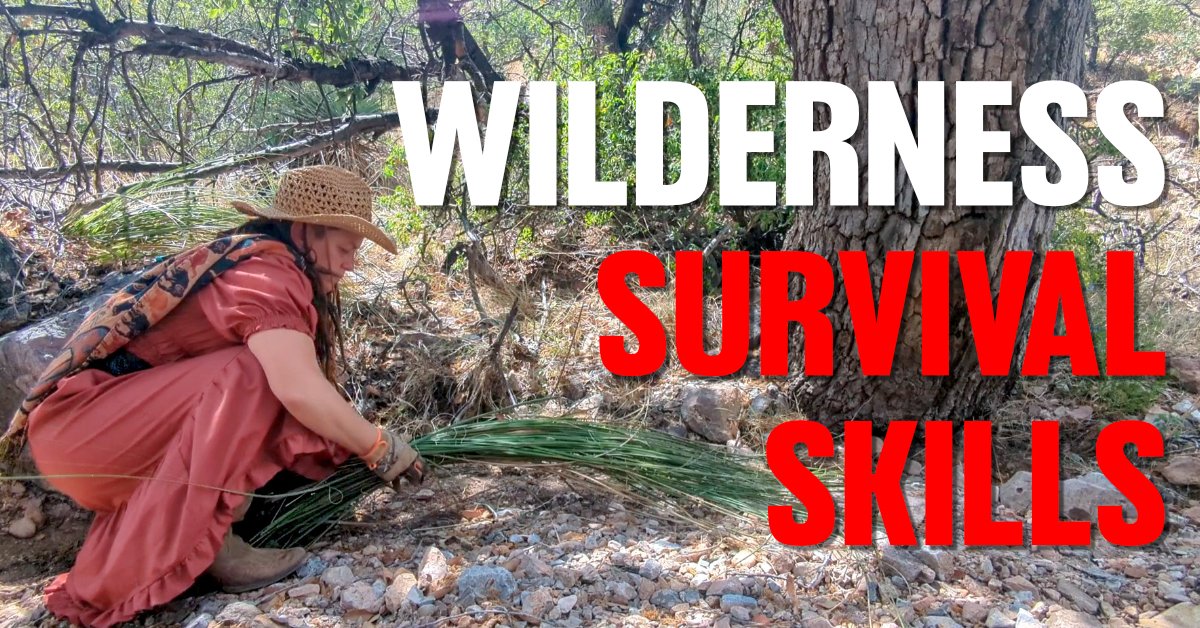
Knowing this skillset can not only help you in times of emergency, but you may have to save others as well.
Wilderness survival comes in two flavors, short term survival which consists of a few days waiting for rescue, or long term wilderness survival which could span from weeks to months, possibly even years, depending on the scenario.
If you are looking for short term solutions then relying on modern day systems works fine. But if you are training for long term scenarios, you will want to build skills that use the natural world around you without having to rely on modern day technologies.
In this guide, I go over the foundations of wilderness survival, primitive survival methods, modern survival methods, and gear recommendations that every backwoods trekker should carry.
Wilderness Survival Tools
Before I get into the pillars of wilderness survival, It would behoove you greatly to have a collection of tools that you can fit into a tactical pack or backpack.
These are the tools I recommend every wilderness enthusiast carries:
1. Shovel – there are some great compactible multitool shovels that are lightweight and are designed to fit into a pack.

2. Survival fixed blade knife – An everyday carry pocket knife is the minimum type of blade you should carry, but you really need to be carrying a fixed blade survival knife that can hack.
3. Field knife sharpener – You need to keep your knife sharp, yet many forget to bring a sharpener. This is a must-have essential while trekking in the wilderness.

4. Illumination – Technically, if you are going full primitive, you can rely on fire as illumination. However, I find a tactical flashlight and a headlamp to be a necessary modern day lighting necessity.

5. Paracord – one of the most versatile survival tools out there, paracord can be used for so many installations from shelter building to fishing.

6. Fire starting tool – although primitive fire building is an excellent skill to have, do not rely on your ability to make fire in the wild. Bring a lighter, matches, flint and steel, etc.

7. Heavy duty backpack – You will need to carry your gear, so don’t skimp on the backpack. If your pack fails, you will be in a serious situation. Comfort is also a factor to consider, especially on long wilderness treks.

8. Emergency blanket – a cheap yet effective life saving tool that should be in every wilderness survival bag.

9. Tarp – even a flimsy cheap tarp is better than nothing at all. A tarp can be used for emergency shelter and keeps your gear dry during downpours. I do suggest upgrading to a heavy duty survival tarp, they are reasonable in price and are much more reliable.

10. Trash bags and duct tape – don’t use the perfumed trash can liner bags, get some good durable outdoor trash bags and a roll of duct tape. There are great for variable survival scenarios.

Interested in more survival gear recommendations? Check out my Ultimate Bug Out Bag Gear article! I go over tons of gear, provide item weights, and classify everything in organized sections. It’s a must-read!
Wilderness Survival Water Filtration and Purification
My first pillar of survival that I cover is water. Without it, we will die, and quickly!
I suggest starting any venture into the wilderness with some water, at least one day’s worth. If you are on a planned trip, make sure to have a water source nearby at all times. If you are in a survival scenario, water should be the absolute first thing to source.
Now, just because the water appears clean, does not mean it isn’t contaminated. Animals poop in water sources which can contaminate the water with bacteria, cysts, protozoa, fungus, and viruses.
The primary microbes of concern are:
E. Coli (coliform) – nausea, vomiting, stomach pain, bloody diarrhea, fever, dehydration.
Giardia (protazoan) – intestinal symptoms include diarrhea, gas, nausea, cramps, dehydration.
Salmonella (bacteria) – cramps, bloody stools, diarrhea, chills, muscle pain.
Candida (fungus) – oral thrush, persistent UTIs, fatigue, skin and nail fungal infection, joint pain.
Norovirus (virus) – fever, chills, vomiting, diarrhea, muscle aches, and pains.
(source)
My case in point – do NOT drink untreated wild water, no matter how clear it appears!

Tips for collecting water in the wilderness
Not all wild water is created equally! The less movement the water has, the more careful your collection needs to be.
Moving water
Always try to collect water that is moving. Moving water is less likely to carry sediments, debris, and less likely to harbor bacteria and protozoa.
Spring water
It is improbable that bacteria and viruses are in spring water – but NOT impossible. I have drank from several mountain springs and have never had an issue. In fact, the water is so delicious and invigorating! But, it was uneducated risks that I took that I will never take again.

If you find a natural spring gushing cool water from the earth, think about the journey that water has taken. Snowmelt fed springs are due to snow seeping through the ground, running downhill, and then emerging as a spring. That snow could have easily been contaminated.
Animal fecal matter has seeped into the soils are everywhere. Even if your water comes from an underground aquaphor, the journey to the top of the soil could have contaminated the water.
It takes very few microbes to contaminate water and make you sick, it’s just not worth the risk, especially when there are very easy ways to purify water in the wild.
Stagnant water
Be especially careful if you must source water that is not moving. Bacteria and viruses can proliferate in stagnant water, let alone all the algae and fungi that can grow.

Try to collect the water from the middle of the pool instead of the edges and avoid scooping any microbial mats and film that forms on the top.
Primitive survival water filtration and purification methods
Please note that filtration and purification are two different methods. Filtration removes sediments and debris but does NOT kill bacteria, viruses, and other microbes. If your water is clear, you can just purify it. If it’s murky and debris filled, you need to filter and purify it.
1. Use the sun to purify water
Yes, sunlight actually kills ALL microbes in water, including bacteria, cysts, fungus, protozoa, and viruses!
Place water in a clear container (preferably glass) and let sit in full sunlight for five hours.
The downside to this method is if you do not have enough sun for the purification to be complete, so have a backup method handy.
2. Boil water for a complete purification method
Boiling water for 2 minutes will undoubtedly destroy all water pathogens including viruses. This is the most thorough, surefire way to know that your water is purified.
3. Run water through activated carbon for filtration
You can make your own activated carbon! Place wood chunks into an airtight container, such as a tin coffee can (with a metal lid, not plastic). Place onto a slow burning fire.

The wood chunks turn into coal but are oxygen starved, which makes activated carbon.
Note that activated carbon does not remove bacteria and viruses.
4. Dig a hole a few feet from the water source for filtration
If your water source is murky, you can get filtered water by digging a hole a few feet away from the water source. It will still be murky, but should be an improvement.
5. Build a survival solar still for pure water
If you have a tarp, you can use it to make a solar still.

Dig a hole in the ground, place some moist vegetation in the hole, place a water catching container in the middle of the hole, cover the hole with a tarp, and let it sit for 24-48 hours. The evaporated water caught in the container will be pure to drink.
6. Filter water through a ceramic container
There probably won’t be any ceramic pots laying around in the wild, but running water through ceramic containers for water filtration has been a method utilized by man for thousands of years and it is extremely effective for providing very clean water. It’s worth a good mention.

The pores of the ceramic take out tons of contaminants, but typical ceramic pores are too large to catch many bacteria and viruses.
Modern survival water filtration and purification methods
There are many modern water filtration systems that are portable and require no power or plumbing.
The primary concern when using a portable water filter is its capability to purify both bacteria and viruses. Although viruses are not as much of a concern in first world countries, if you are traveling abroad or want to be extra thorough, you will need a water filter that removes both kinds of microbes.
Purification Tablets – these tablets will purify your water of both bacteria and viruses. These should be carried at all times for an emergency backup method for water purification.

Platypus water filter – The Platypus water filtration system filters and purifies water using gravity.

Survival Filter Pro – this is another portable system that both filters and purifies water. This is a hand pump system.

If you are interested in more product recommendations and overall emergency water advice, have written a comprehensive guide to the best emergency water filters if you are interested in learning more about modern filtration and purification products.
Special note about eating snow for survival hydration
If you are in a winter wilderness survival situation, do not eat snow for hydration.

First off, the snow can be contaminated, just like water.
Secondly, the amount of energy the body spends to melt the snow in the stomach will actually make you more dehydrated as the moisture the snow provides is not enough to cover the digestive cost.
Third, snow doesn’t actually contain that much moisture, especially in colder temps. The amount of snow you would have to eat is not a 1:1 ratio to water.
Fourth, the cold snow can lower your body temp putting you at risk for hypothermia.
Melt your snow first, and bring it to a boil to kill microbes. Drinking hot water will help prevent hypothermia as well.
Wilderness Survival Fire Starting Methods
Building a fire is an essential survival skill and is used for heat, illumination, cooking food, deterring wild animals, and can also be used for shaping tools.

Tips for collecting firewood
In a short term survival situation, it is better to collect wood and sticks that are already dried as opposed to timbering fresh trees. It takes one whole year for each inch of wood to properly dry before burning!
How to tell if wood is dry:
- cracks on log ends
- bark separates easily
- wood is not green; brown or grey in color
- wood pieces are light in comparison to size
- hollow-ish sound when knocking
While on the hunt for dried firewood, make sure to collect sticks as well. Starting with sticks atop of tinder will be much easier to ignite than large logs.
When you are out collecting, you will need to haul the wood back to your basecamp. Larger pieces can be chopped with an axe or hacked apart with a large survival knife. You can also use a compact pocket chainsaw, a perfect fit for a pack.

Paracord comes in really handy while hauling out firewood. You can tie up your bundles and make a carrying handle.
Once gathered, make sure to protect your firewood from moisture. The amount of time it takes for wood to dry after rain varies, but can take an average of two days in moderate climate conditions for the wood to completely dry.
A tarp or trash bag works well to protect the wood.
Tips for collecting tinder:
Tinder is a necessary material for starting a fire. The tinder catches the spark which ignites the small sticks, which in turn ignites the logs.
Tinder>>sticks>>logs
Natural tinder materials
1. dry pine needles and boughs
My favorite tinder, dry pine needles practically explode when lit due to the sap content
2. pine cones
3. dry leaves
4. dried out lichens and mosses

5. dead grass
6. dried tree sap
you know it’s dry when it crystallizes
7. Cattails
these naturally packed pods provide tons of tinder

8. bird nests
9. bark of all kinds
10. cow patties
also known as buffalo chips, this is how our pioneers on the prairie stayed warm!

11. coal fungus
clods of fungus that grow on trees and looks like coal

A trash bag works great for collecting tinder and keeping it dry.
Building a teepee fire
This is the quickest and easiest fire building method and does not require a structure.
Step one: Place bundle of tinder in middle of desired fire location.
Step two: start to build a teepee shape around the kindling with small twigs.
Step three: work up the teepee structure to the large logs on the outermost layer.
Step four: place the spark in the tinder. While building your teepee, you can leave a peephole to access the tinder.

The flames will push up through the teepee structure and eventually the logs will collapse in, making a nice base for you to add more fuelwood. Easy!
Primitive fire starting methods
With a little engineering, you can create a primitive fire starter from wood and cordage.
The goal is to create an ember from friction which can then be placed onto a tinder pile.
Hand Drill
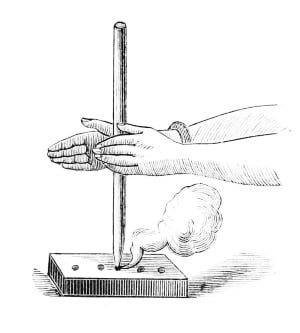
Hand Plough

Bow drill

Special Note: Using Rocks to Make Fire
You will need a piece of carbon steel as any other steel is too soft to make a spark.
Find a rock with a silica base and hardness of 6.5 or more and you are in business!
You can identify a spark-making stone by finding rocks that are smooth and shiny with a micro crystalline matrix or with a silica base.
List of Spark Making Rocks
Flint

Quartz

Chert

Obsidian

Agate

Jasper

Modern Fire Starters
Flint and Steel – It’s an old-school fire starting method, but I categorize flint and steel as a modern fire starter since you need a piece of carbon steel that is not readily available in the wild. Scrape the steel down the flint and sparks will ignite the tinder.
I recommend upgrading to the ferro rod which produces tons of 1,000 degree sparks.
Matches – I recommend getting a set of waterproof matches as an upgrade from regular matches. They are a little spendy but a good backup fire starter.

Lighter – A lighter won’t last forever but is very convenient. This waterproof windproof butane free lighter is a pretty cool choice that you can recharge.

Magnesium – magnesium shavings won’t start a fire but will take a spark and ignite very hot.

Pyro Putty – Pyro Putty is a newer material that will ignite and stay lit in super-cold conditions. It’s lightweight and portable, making it an excellent choice to tote around in your wilderness survival bag.

Building a Survival Shelter
When building a survival shelter, don’t sweat making it elaborate. You don’t want to exert too much energy trying to fashion branches and foliage for a building that you will abandon within a day or two.
If you are on a longer term wilderness survival scenario, you can develop a more robust shelter. Make sure to plan the location out with long term survival in mind – food, water, and protection from elements are important factors.
Shelter building materials
Long and straight branches, preferably dry
Branches with leaves attached for insulation
Broad leaves for roofing
Dried leaves for insulation and bedding
Cordage making materials like vines or plant fibers
Mosses for insulation and bedding
Grasses for insulation and bedding
Primitive survival shelter building methods
There are elaborate primitive shelter building methods, but I am focusing on the easiest ones to execute because when you’re in a survival situation, you need to utilize time management and not get caught up in engineering a shelter that you will only be in for a few days.
Cocoon Shelter
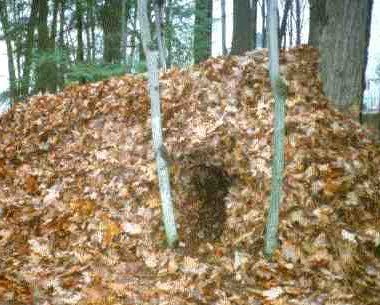
This is the most primitive and quickest survival shelter you can make when you are in a pinch. It requires no timber, just cover yourself with insulating materials such as dried leaves or boughs to keep in heat. It probably will not be that comfortable but will do in a pinch.
Lean-To Shelter

This is the second easiest shelter to build as you utilize naturally occurring structures (such as the stumps in this setup) and create a one-sided 45 degree angle shelter by leaning branches against the structure. Be conscientious about wind direction if you have an open side. You can also utilize large rocks, fallen trees, and natural walls with this method.
Fallen tree shelter

If you are lucky enough to find a fallen tree with enough space under the trunk, you can build a fallen tree shelter fairly easily. Just lean limbs and branches along the fallen trunk to form a V shelter.
Teepee shelter
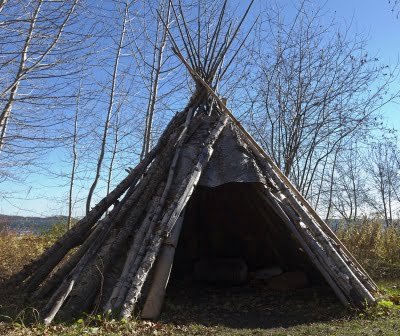
The teepee shelter is a little more elaborate than the aforementioned shelters but can go up fast and works well if you do not have a fallen tree or lean to base structure.
Step one: collect three similarly sized tree limbs. This forms the base tripod for your teepee.
Step two: tie the top of the limbs together with cordage (paracord works great).
Step three: erect the teepee by spacing the three limbs out uniformly.
Step four: add more limbs to the teepee.
Step five: tie all the limbs together at the top with more cordage.
Step six: your final step is to insulate the teepee with a tarp, leaves, or boughs.
Modern survival shelter methods
Emergency shelter – these handy kits are cheap and come with cordage and a three sided emergency tent.

Survival tarp – these tarps are insulated and heavy duty to withstand the elements. You can use a tarp for all the shelter building methods I have listed above. You can also make a tarp into a hammock.
Life bivy – these handy emergency sleeping bags are like an emergency blanket but is fashioned into an over-head sleeping bag, keeping you even more insulated.

Ultralight tent – These tents go up quickly and are super light and compact.

Special note: Winter and desert shelters
If you are in a winter situation, you can build a survival shelter with snow. Snow has an insulating effect, so you can dig an empty space into a snow berm and use that to protect you from the elements.

In the desert, you may not have any timber lying around to make a shelter. I would suggest finding a location that could protect you from the elements, such as a rock overhang or cave. If you are in the desert, an emergency shelter kit is a vital component to carry with you at all times, or at least a tarp.
Foraging for Food in the Wilderness
Finding food in the wilderness is not easy, but with the proper knowledge and tools, you can excel at providing nutrients for yourself and others in a survival situation.

The first thing you need to do is focus on knowledge. One of my specialties is identifying edible and medicinal wild plants. I have guidebooks in print and have done lots of field research and identification.
It takes time and knowledge to learn skills of hunting, trapping, and foraging edibles. It is also very important to focus on your region as animals and plants can vary greatly, although there are wild plant species that occur all over the country in abundance.
Tips for collecting wild edible plants and mushrooms
Always have a field guide in print to identify wild edibles. Relying on your phone for identification is not reliable and is not as efficient as having a small field guide. Your guide should have clear photos in color to help you identify the plant, along with descriptors. Remember that plants have variations so make sure to properly identify before consuming.
There is a common concern that there are too many poisonous mushrooms out there to bother collecting edible mushrooms. This is simply not true. Do not be scared of the mushroom! Rather, have a thorough field guide that can help you easily identify an edible mushroom.

If you have trouble identifying a mushroom then leave it be. If you are certain it is an edible mushroom then enjoy this nutritious find.
Proper tools for harvesting wild edibles
You will need some tools to get the best out of your harvesting efforts.
A pocket knife will work just fine for cutting plants and mushroom stalks.

These straight blade pruning shears work awesome for collecting wild edibles.

Built for digging in dirt, the Hori Hori digging knife is notorious for its excellency in unearthing roots, cutting branches, digging holes, and is good for general outdoor knife activities.

Responsible harvesting for bounties years to come
Please harvest responsibly so you can enjoy recurring bounties for years to come. If you wipe out an entire species in a location, you screw the pooch on ever being to collect in that area again.
When harvesting mushrooms, cut them at the stalk instead of pulling them out of the ground. This leaves their mitochondrial mats intact so they can keep multiplying.
Do not harvest so much off one plant that it kills the plant. If you harvest the whole plant for greens and roots, leave some of the same species in that area intact so they can seed.
Wilderness Survival Trapping
Small game can be a “game changer” (pun intended) when surviving in the wilderness. Rabbits, squirrels, and other critters can keep you alive even though they are small. You can expect to get 150 calories per 3 ounces of meat from a critter.
Trapping is a good passive method of catching critters, but can be very hit and miss. If not constructed perfectly, the critters can steal the bait without triggering the trap to collapse.
Primitive fishing methods
We have so many modern day baubles and gadgets to catch fish, yet it’s still easy to get skunked!
Using passive primitive fishing methods can up your chances without having to babysit a line.
Basket fish trap
Your basket fish trap will probably not be as fancy as these but will work just as well.
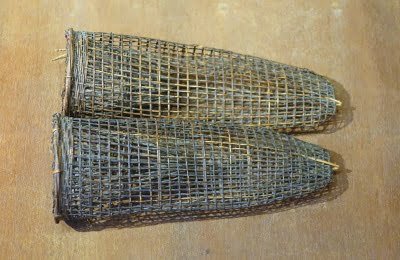
Basically, a fish trap is like building an inverted teepee, with a round ring at the opening. Gather straight sticks and lash them together at the top. Fan them out into a cone shape. Then weave the basket with vines or cordage in and out of the stick bones.
You will need to build a second cone that is smaller in size to place within the trap. This is how the trap works. The fish swim in through both cones, but then cannot figure out how to come back out.
Make the secondary cone with a small opening at the top so the fish can go through. Make sure the opening is big enough for your target to swim through but not too big to where they can figure out how to come back through.
Place the basket where it will not float away and let it marinate for several hours. Don’t forget to bait the trap as that is what attracts the fish to come into the trap.
M Funnel Fish Trap
This concept works like the basket, but uses sticks driven into the bed of the water source in the shape of an M. The fish swim in the narrow opening but cannot figure out how to get out.
This method is a timesaver in comparison to weaving the fish basket trap, but is not portable and can only be used in shallower depths.

Between foraging for wild edibles, trapping critters, and using passive primitive fishing methods, you should be pretty well off for getting calories in a wilderness survival situation.
Navigation in the wilderness
I strongly suggest having a printout map of the area you will be in. Relying on electronic devices for mapping could be a point of failure and a paper map could prove to be invaluable.

You can use a compass alongside your map to really enhance your orienteering.
I have found an excellent article by My Open Country that will teach you everything you need to know about how to navigate with a map and compass. Check it out!
Primitive navigation skills
There are ways to navigate without having to use any modern day tools, including maps and compass. After all, our ancestors didn’t have any of these things.
Using the sun for navigation –
Drive a stick into the ground. Make a mark where the shadow of the stick is. Wait fifteen minutes and make another mark. Now connect the two marks; this line runs North to South every time.
Using the stars to find North –
If you have a clear vision of the night sky, you can identify Polaris, aka the North Star, to find North. Polaris is the star at the tip of the handle of the Little Dipper.

The Little Dipper can be a bit tricky to find, so the first step is to identify the Big Dipper. The tip of the cup of the Big Dipper points directly at the handle of the Little Dipper.
Using moss to find your direction –
Yes, moss can be a good indicator of North, in the Northern hemisphere. Moss prefers shady spots, so it makes sense that they would grow on the North side of trees as it gets little light.

Note that in the Southern hemisphere, moss actually grows on the South side of trees. Interesting, eh?
The needle leaf compass –
If you have a magnet, needle, leaf, and some water, you can make a homemade compass. Hold the eye of the needle and stroke it against the magnet in one direction for about fifty times. Place the needle into a leaf, then float the leaf on standing water. The needle tip will point to magnetic North.
Follow the water for civilization –
You can follow a creek, which will flow into a stream, which flows into a river, which may flow into a lake or go by a town. This isn’t foolproof (especially in remote places like Montana or Alaska), but there is logic to the theory.
Modern navigation skills
Google Maps and Google Earth – Although Google makes no claims of accuracy with their digital maps in their Terms of Service, it is an excellent way to navigate in satellite mode. In Google Earth, you can zoom in and rotate the map, giving you features of the landscape.

GPS navigation device – Garmin makes the GPSMAP 64st which is a great handheld GPS device for hunters, hikers, backpackers, explorers, and overall outdoor map users. Just make sure to have a solar power charger with you so you don’t run out of juice.

Survival Communications
If you are in need of rescue, or just need to signal your location to nearby friends, knowing how to create signals from scratch could be a lifesaver.
Primitive signaling methods
Make a fire – You can make a bonfire to signal at night or if you are at the top of a hill or mountain. Just make sure to manage the fire and not let it burn out of control.
Use Smoke Signals – Smoke signals can be even more visible as smoke can drift up for thousands of feet in the air, giving miles of visibility.

You need to make a dense dark smoke which can be made with wet leaves and grasses, smoldering woods, animal dung, and even oils and saps. Once you have your fire nice and smoky, cover it with a wet blanket.
The smoke builds up under the blanket; once the smoke has built up to a large amount, remove the blanket. This causes an extra thick puff of dark solid smoke. Keep repeating this process for a clearly manmade smoke signal.
Write out a message – Find a clearing and use natural materials to write a very large message, usually the word HELP will do the trick. This typically only works if aircraft are actively looking for you. I would use this method in conjunction with a fire or smoke signal.
Make a grass whistle – if you need to make an audible signal, the louder the better. Find a long blade of grass and sandwich it between your thumbs. Cup your hands and blow between the thumbs.

Modern signaling methods
Aerial Flares – These are good to tote around in your pack and can also be used for self defense if need be.

Strobes and flashlights – You can signal to aircraft at night with a high beam flashlight or strobe. If using a flashlight, pulse the light or send up an SOS code. I found this strobe flashlight intended for emergency use.

Signaling mirror – I suggest always having a signaling mirror as it does not rely on fuel, ammo, or batteries, and is compact and effective for signaling. Using glass is not the best idea as it can break, rather an acrylic mirror that is specially made for signaling is your best bet.

Emergency whistle – these are designed to be durable and very LOUD.

Survival radio – A two way radio can be carried about for a communication method in case of an emergency. The main issue is keeping a charge which can be achieved by carrying extra batteries or using a solar charging unit.

Satellite communication device – The good thing about satellite devices is that they can be used anywhere in the world. The bad thing is that they are very expensive and some devices require a subscription. You will also need to be mindful of the charge on the device.
This Garmin inReach Explorer+ is a handheld GPS TOPO map and a satellite communicator.

Wilderness Survival First Aid
There are all sorts of first aid scenarios to be aware of when trekking in the wilderness.
Exposure – dehydration, hypothermia, overheating/heatstroke, sunburns
Injuries – scrapes, burns, cuts, broken bones, sprained ankles, bruises
Bites and stings – snake bites, ticks, mosquitos, bees
Poisonous plants – poison oak, poison ivy, poison sumac, poisoning from ingestion
Primitive first aid skills
Mother nature provides us with materials that we can use to apply first aid in the wild.
Straight branches can be used as splints for broken bones. Make sure to secure the broken bone from joint to joint by using paracord, cloth, or natural cordage.
Peat moss can be used in replacement of cotton to dress wounds. Peat moss is twice as absorbing as cotton, is a deodorizer, and has antiseptic properties. (source)

Juniper berries grow in so many places and have antibacterial properties. Make a Juniper berry mash and apply directly to the wound.

Honey has amazing antibacterial and healing properties on scrapes and cuts. Getting the honey in the wild, however, may cause more injury than good!
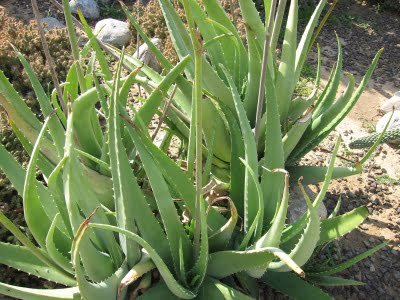
Aloe Vera plant is plentiful in some areas and provides extraordinary burn relief and moisturizes the skin.
Ashes can soothe bites, stings, and skin irritation from plants. Mix ash with water and make a paste; apply directly to the irritation.
Modern first aid skills
There are so many great compact first aid kits that are cheap! It’s worth purchasing one and putting in your pack and also having another one in your vehicle.
Most modern first aid kits will contain all of the basics to treat cuts, scrapes, and burns.

Another light and affordable item for your pack is the Israeli bandage. These vacuum sealed sterile compression bandages unravel several feet long, great for using on medium to large wounds and wrapping broken bones.

Quick Clot is another modern invention that could be a literal lifesaver. This stuff can stop bleeding in a serious way, I am talking about stopping blood gushing from a bullet wound!


I ALWAYS CARRY my tick removal tool! It is so cheap and safely removes ticks by putting the device around its head and twist. I have removed many ticks off my animals and myself painlessly.

Protection from Wild Animals
I recommend carrying a sidearm at all times while traversing in the wilderness. In most cases, a wild animal will be scared off just from the sound of a discharging gun.
I also recommend carrying bear spray even if you aren’t in bear country. Bear spray will work on any wild animal that has eyes and lungs.

No matter what wild animal you encounter, stay calm and be prepared with knowledge on how to react. Many, if not most, animal attacks in the wild could have been circumvented if proper protocol was taken.
Let’s take a look at how you need to approach a wild animal encounter by species:
Bear Encounters
Bears are generally not aggressive and attacks are very rare. However, if you startle a bear within their personal space (within 10 to 50 feet) and/or the sow bear has cubs or the bear is feeding on a carcass, the chances of aggressive attacks increase.

Try to avoid close encounters by hiking in larger groups and making lots of noise.
If you encounter a bear within its personal space:
Do not run. This triggers their prey drive. Rather, remain calm. Talk to the bear in a calm voice and slowly back away. Make sure to have your gun or bear spray ready to use. Most likely, the bear will run away at this point.
If the bear is not backing down then prepare to defend yourself. I suggest shooting a warning shot to try and scare the bear away.
If a sow bear attacks you in an attempt to protect her cubs, lay on the ground and play dead, stomach down with your hands covering your neck. Spread your arms and legs so the bear cannot flip you over. Do not move until the bear is long gone.
If the attack persists and the bear is trying to eat you, fight back. Attack the face of the bear with whatever weapon you have.
Wondering if you should use a sidearm or bear spray for defense? Here’s a really good article that is quite eye opening on the topic.
Wolf encounters
Wolves are not naturally inclined to attack humans and are wary of encountering us. Most wolf attacks in the past few decades have been directly related to wolves having rabies.

What to do if you encounter a wolf:
Do not run. Make yourself look larger and maintain eye contact with the wolf. Back away slowly while maintaining your stance. If the wolf does not back down at this point, fire a warning shot or throw objects at the wolf.
If the wolf makes contact, fight back aggressively and show that you are too dangerous to be attacking.
Mountain Lion Encounters
The chances of seeing a mountain lion, let alone encountering one, in the wild are very sparse. Mountain lions are sneaky and are extremely wary of humans.

If you do have a mountain lion encounter:
Do not run or turn your back to the cat. Make yourself look big, use shouts and throw objects to scare it off. Back away slowly but never show fear. Keep eye contact.
If you do get attacked, you will probably not see it coming, as they use the element of surprise. Do not play dead. Fight back as hard as you can and show the lion you are not worth fighting with.
Rattlesnake encounters
Rattlesnakes do not want anything to do with humans and will usually flee if it has space to. If you encounter a rattlesnake, immediately freeze. Locate the source of the snake by the rattle if it is not in vision. Back away from the snake and give it distance so it can go its own way.

Wearing rattlesnake shin guards is a good way to protect yourself from its bite, especially if you are hiking in dense tall vegetation.
These guards are made of polycarbonate armor. I like that they go over the knee too for a better fit.

Conclusion
There is a whole lot to know and learn about survival in the wilderness. It takes more than just reading; you HAVE TO practice your survival skills!
I suggest getting out there and experiencing the real thing. Practice shelter building, fire making, foraging, etc. And get good at it.
I hope you have enjoyed my ultimate wilderness survival basics guide! All the products I recommend I either own or plan to own in the near future.
If you have any comments, please leave them below.


Very informational thank you.